Ingress
Introduction
Self-hosting is awesome, but what’s even better is being able to share it with your friends and family by making your services accessible over the Internet. There is one major point be aware of first though: exposing services to the Internet for your friends and family also means that you’re also exposing your servers to potential hackers and bad actors. If the entry point to your internal systems are compromised, malicious actors can infiltrate your network, leading to potential data breaches, malware, theft of sensitive information, and even complete control over your infrastructure.
Sub Optimal Solutions
In the rest of this post we’ll explore a few commonly recommended solutions to this problem that are sub-optimal, explain why they fall short, and then present a superior alternative.
Why to avoid direct ingress
One way to expose your services to the internet would be providing direct ingress to your home network by opening a specific port in your local firewall and running a reverse proxy listening on that port, which would forward all incoming traffic to your various services. This also implies that you would create DNS records pointing to your home network’s public IP for your various services.
Unfortunately there are two major downsides to this simplistic approach.
DNS records are public, so creating a DNS record for
my-service.my-homelab.dev to point at <my homelab IP> means that anyone
on the Internet knows the IP address of your server that hosts your valuable
data. This greatly increases the likelihood of direct attacks such as DDoS,
port scanning, intrusion attempts, and also leaks geographic information about
your homelab.
Additionally, in some cases it’s impossible to expose your home network directly. Many ISPs use technologies like Carrier-Grade NAT (CGNAT) to manage the limited availability of IPv4 addresses. CGNAT assigns private IP addresses to multiple customers, sharing a single public IP address among them. As a result, inbound connections from the Internet cannot be directly routed to your home network, preventing you from exposing services directly, regardless of what the security trade-offs might be with this approach.
Why to avoid Cloudflare Tunnels
One commonly suggested solution for this problem is Cloudflare Tunnels. While Cloudflare Tunnels are very popular these days, they come with significant trade-offs of security in the name of convenience. When using Cloudflare Tunnels, all of your data and traffic are routed through their infrastructure, where TLS termination occurs. TLS termination on Cloudflare’s servers means that encrypted data is decrypted and processed by Cloudflare before being forwarded to your server, which can introduce privacy concerns since Cloudflare has access to the unencrypted data, creating a potential point of vulnerability and dependency on their security practices to protect sensitive information.
Of course, there are good reasons why many people are okay with this trade off. Namely, Cloudflare has a very good public reputation and is known to follow best practices for security. This is understandable, especially because setting up secure ingress can be time-consuming without prior experience and knowledge. However, despite how much trust Cloudflare has earned over the years, there is still the aspect of having to trust a third party corporation that has a fiduciary responsibility to their shareholders to maximize profits, and past experience has shown that zero-trust is a better practice and worth the extra effort required.
Hopefully, this guide can help provide a easy to follow process to setup secure ingress with minimal reliance on third parties.
Secure, Zero-Trust Approach to exposing services
The ideal way to expose services are to protect your homelab IP from being publicly available, terminate TLS on your own servers, and to not open any ports on your firewall. One way to do this is by renting a VPS in the cloud, pointing your DNS records at the VPS, and creating a VPN between your VPS and your homelab server(s).
A note on terminology: Server in this context means the VPS server in the cloud, and client means your homelab server running within your local network.
Setting up a reverse proxy on your VPS
You could choose any VPS and reverse proxy you want, however this guide will cover using Digital Ocean and Nginx Proxy Manager.
- Go to Digital Ocean, create an account if you don’t have one, and sign in.
- Create a Droplet. This is the VPS server that will run Nginx Proxy Manager
and connect to your homelab via a VPN. Follow this guide
from Digital Ocean if you’re unsure how to create a Droplet.
- The cheapest Droplet option should suffice, at the time of writing this costs $5/month.
- You can choose any OS you which, although this guide assumes Ubuntu 23.10 is used.
- Find the public IPv4 address of your VPS, you may find this in your dashboard. Keep this handy as you will need the IPv4 address numerous times in this guide.
- SSH into the VPS you’ve just created. Follow this guide from Digital Ocean if you’re unsure of how to SSH to your server.
- Now that you’ve connected to the VPS via SSH, run the following command
on the VPS server:
mkdir -p docker/nginx-proxy-managerand thencd docker/nginx-proxy-manager. - Create a new
docker-compose.ymlfile in your editor:vim docker-compose.yml. - The file should look like the example below. You can find more documentation on setting up Nginx Proxy Manager on their website if you have more questions.
- Save the file, and then run
docker compose up -d. - Go to
<your-vps-public-ip>:81to change the login details for the admin user. The default admin user will have email:admin@example.comand password:changeme - Comment out the line that says:
- '81:81' # Admin Web Portin the example configuration below and then rundocker compose stop && docker compose up -d. Note thatdocker compose restartdoes not reflect changes made to thedocker-compose.yml, hence needing to run this instead. This makes the admin interface inaccessible to the public interface when you don’t need it. You can always uncomment this line and restart the service again to make it accessible again. You should only expose the admin interface when you need to use it.
Click to expand docker-compose file for Nginx Proxy Manager
services:
  app:
    image: 'jc21/nginx-proxy-manager:latest'
    restart: unless-stopped
    ports:
      # These ports are in format <host-port>:<container-port>
      - '80:80' # Public HTTP Port
      - '443:443' # Public HTTPS Port
      # Comment out the below line when not using the admin interface
      - '81:81' # Admin Web Port
    environment:
      # Uncomment this if IPv6 is not enabled on your host
      DISABLE_IPV6: 'true'
    volumes:
      - ./data:/data
      - ./letsencrypt:/etc/letsencrypt
Setting up WireGuard on your VPS and your homelab server(s)
You could choose any VPN you want, although for the purposes of this guide we will use WireGuard.
To get started with WireGuard, follow these steps:
- Install WireGuard:
sudo apt update && sudo apt install wireguardon both the VPS server and your homelab server. - Generate a key pair for the server and each client:
- On the VPS server, run:
wg genkey | tee private.key | wg pubkey > public.key - On the homelab server, run:
wg genkey | tee private.key | wg pubkey > public.key
- Configure the VPS Server:
- Create a configuration file:
sudo vi /etc/wireguard/wg0.confwith the following context:
[Interface]
Address = 10.10.10.1/24
ListenPort = 51820
PrivateKey = YOUR_SERVER_PRIVATE_KEY

[Peer]
PublicKey = YOUR_CLIENT_PUBLIC_KEY
AllowedIPs = 10.10.10.2/24
Replace YOUR_SERVER_PRIVATE_KEY and YOUR_CLIENT_PUBLIC_KEY with the actual
keys you generated in step 2.
- Configure the Client
- Similarly, create a configuration file by running
sudo vi /etc/wireguard/wg0.conf:
[Interface]
Address = 10.10.10.2/24
PrivateKey = YOUR_SERVER_PRIVATE_KEY

[Peer]
PublicKey = YOUR_CLIENT_PUBLIC_KEY
AllowedIPs = 10.10.10.1/24
Endpoint = YOUR_VPS_PUBLIC_IP:51820
PersistentKeepalive = 25
The IP address for your VPS (YOUR_VPS_PUBLIC_IP above) would be the same IP
you use to connect to the VPS server via ssh. You will, of course, want to
again replace YOUR_SERVER_PRIVATE_KEY and YOUR_CLIENT_PUBLIC_KEY with the
actual keys you generated in step 2.
- Start WireGuard on both the VPS server and homelab server client by running both of the following commands:
sudo wg-quick up wg0will start the VPN immediatelysudo systemctl enable wg-quick@wg0to configuresystemdto start WireGuard automatically on reboot.
- Verify the configuration: you should be able to test connectivity to the VPS
server from the Homelab server by running
ping 10.10.10.1, and vice versa by runningping 10.10.10.2. You should also be able to runsudo wg showto check the current configuration and device information. To give an example, on the homelab server you should see an output like:
tom@server:~λ sudo wg show
interface: wg0
  public key: YOUR_CLIENT_PUBLIC_KEY
  private key: (hidden)
  listening port: 55812

peer: YOUR_SERVER_PUBLIC_KEY
  endpoint: YOUR_VPS_PUBLIC_IP:51820
  allowed ips: 10.10.10.0/24
  latest handshake: 1 minute, 19 seconds ago
  transfer: 37.12 GiB received, 16.50 GiB sent
  persistent keepalive: every 25 seconds
The values for YOUR_CLIENT_PUBLIC_KEY and YOUR_SERVER_PUBLIC_KEY will switch
depending on whether you run sudo wg show on either the homelab server or the VPS server.
DNS Records
In order for your friends to be able to type mastodon.your-domain.dev in
their browser and then subsequently have their request to visit your site be
translated to your homelab server’s IP to fulfill such request, we need
to configure some DNS records.
You’ll need to add two custom A records that point to your VPS server’s public IP.
One will be for host * and the other will be for *.*.
Adding Services to Nginx Proxy Manager
- SSH back into your VPS server and
cd ~/docker/nginx-proxy-managerand check to make sure the admin interface is accessible in thedocker-compose.ymlfile (check if the81:81port configuration is commented out). - Go to
<your-vps-public-ip>:81in your browser and sign in. - Go to
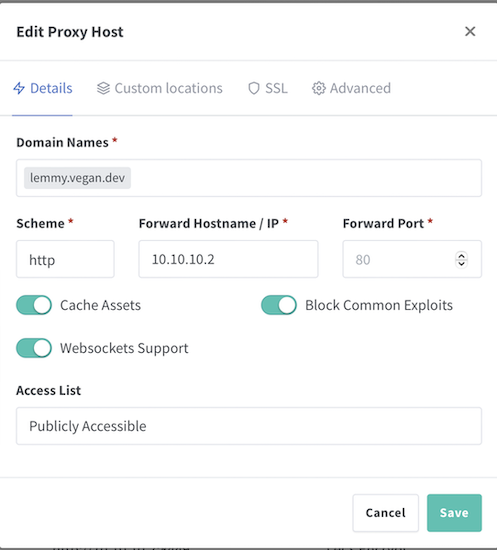
Proxy hosts > Add Proxy Host - Enter the URL you want in
Domain Names- I use the form<service>.<domain>.<TLD>, e.glemmy.vegan.dev. - For
scheme, usehttp, forForward hostname, use10.10.10.2and forPort, use the appropriate port for that particular service. - I also usually enable the
Cache assets,Websockets support, andBlock common exploitsoptions.
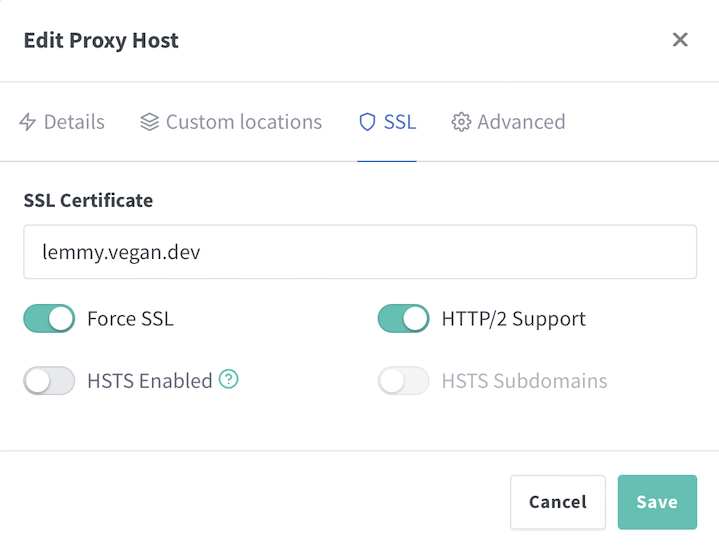
- In the
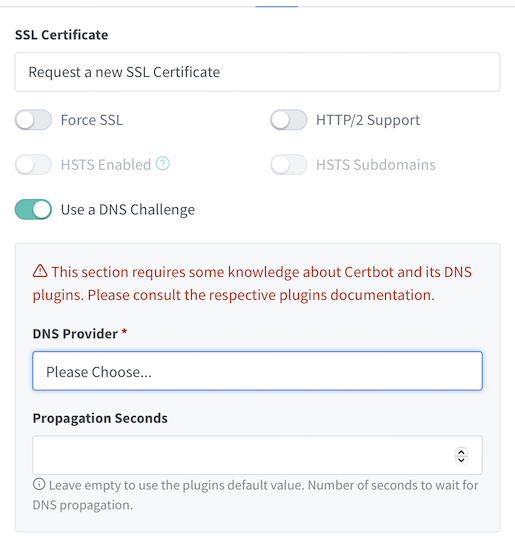
SSLtab, must configure your certificates so that you can useHTTPSon your site. This provides necessary encryption and all browsers these days denote if a website is usingHTTPSby a lock icon in the URL bar. I would recommend using Let’s Encrypt to get your certificates.- Because of how we’ve configured our ingress, the default
HTTP-01Let’s Encrypt challenge will not work and will fail with errors. Instead we should useDNS-01Let’s Encrypt challenge
- Because of how we’ve configured our ingress, the default
- Congratulations! If you go to
<service>.<domain>.<TLD>in your browser you should be able to connect viaHTTPSto the reverse proxy running on your VPS server in the cloud, and then via en encrypted VPN connection from your VPS to your homelab server in your local network, all extremely securely.